|
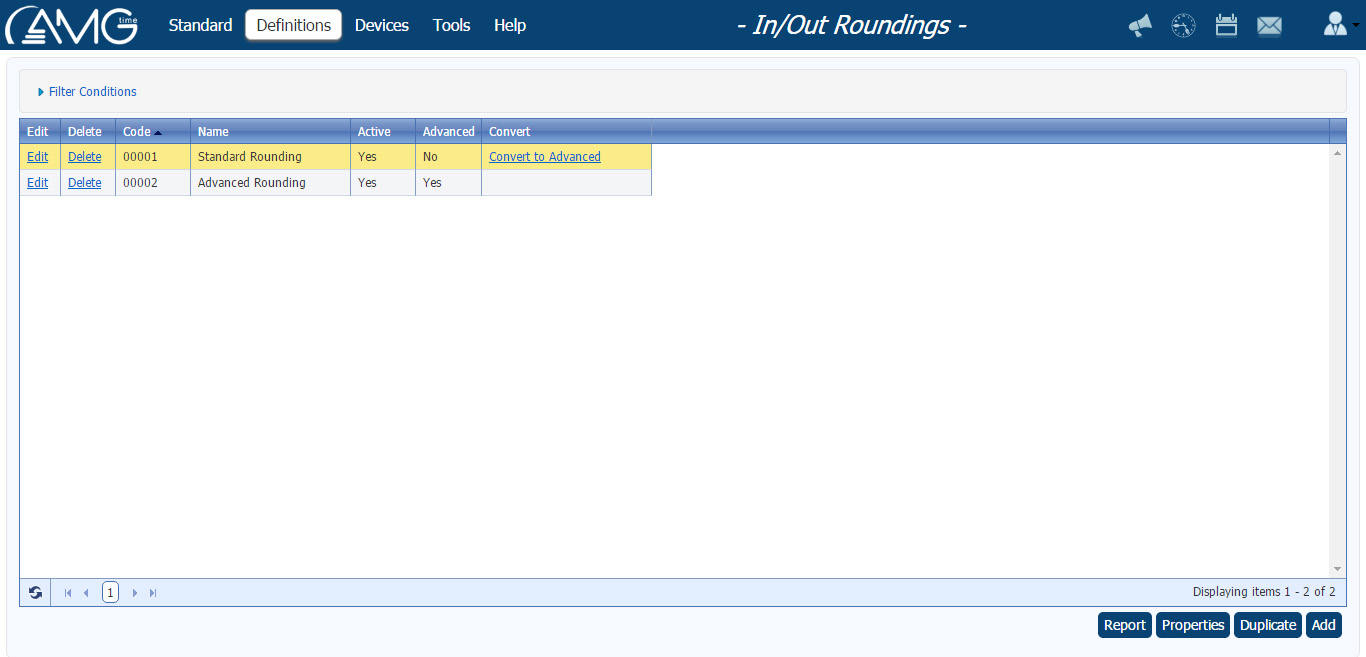
The In/Out Rounding page displays a list of all In/Out Rounding rules, and allows you add, edit and delete In/Out Rounding rules.
The main part of the page is the list of In/Out Roundings. The list can be sorted by any column both ascending and descending by clicking on desired sort Column's title. The list has other properties that can be altered: the columns can be hidden or displayed, the order of the columns can be changed, and the list of In/Out Roundings can be filtered by some criteria. (Click here to see the description of these properties.)
To hide/show columns:
- Click on the Properties button.
- In the Columns list select or unselect the column you want to show or hide.
- Click on the OK button.
To reorder the columns:
- Click on the Properties button.
- In the Columns list select the column you want to move up or down.
- Click on the Move up
 button to move the column up, or on the Move down button to move the column up, or on the Move down  button to move the column down. button to move the column down.
- Repeat steps 2 and 3 to reorder all the columns you want.
- Click on the OK button.
To filter the list:
- Click on the Filter button. (The Filter Conditions panel will appear).
- In the Filter Conditions panel enter or select the criteria by which you want to filter.
- Click on the Refresh button.
Filtering the list will display only those entries that correspond to the entered or selected criteria. If no In/Out Rounding corresponds to criteria, then no record will be displayed in the table. To view all In/Out Roundings, or to start over, click on the Reset button.
To hide the Filter Conditions panel, click again on the Filter button.
 Note: Note: |
- If you don't remember the whole Code or Name of the In/Out Rounding, you can search for a single letter found anywhere in Code or Name.
- You can simultaneously filter by more than one criteria.
|
|
To add new In/Out rounding:
- Click on the Add button. (A new page opens - Add In/Out Rounding.)
- Enter code and name of the rounding in the Code and Name text boxes, respectively.

- Enter values into the fields of Start (IN Punches) and Stop (OUT Punches) boxes. (Click here to see the description of the fields.)
Start (IN Punches)
Round (forward to the scheduled start time)
Enter the time (in minutes) starting from which the Clock in time should be rounded forward to the scheduled Start time. For example, if the scheduled Start time is 8:00 and Round time is 15 minutes, it means that if the employee clocks in any time from 7:45 to 8:00, then the timecard will reflect a rounded start time of 8:00.
Grace (back to the scheduled start time)
Enter the time (in minutes) until which the Clock in time should be rounded back to the scheduled Start time. For example, if the scheduled Start time is 8:00 and Grace time is 10 minutes, it means that if the employee clocks in any time from 8:00 to 8:10, then the timecard will reflect a rounded start time of 8:00.
Dock (forward past the scheduled start time)
Dock time shows the time to which the start in time will be rounded, if the employee clocks in after Grace time. For example, if the scheduled Start time is 8:00, Grace time is 10 minutes and Dock time is 20 minutes, it means that if the employee Clocks in after 8:10 till 8:20 then the timecard will reflect a rounded start time of 8:20.
Time
Enter any time as an example of scheduled Start time to show Round, Grace and Dock times on the clocks.
Stop (OUT Punches)
Dock (back prior to the scheduled stop time)
Dock time shows the time to which the Clock out time will be rounded if the employee clocks out before Grace time. For example, if the scheduled Stop time is 18:00, Grace time is 10 minutes and Dock time is 20 minutes, it means that if the employee clocks out before 17:50 starting from 17:40 then the timecard will reflect a rounded start time of 17:40.
Grace (forward to the scheduled stop time)
Enter the time (in minutes) starting from which Clock out time should be rounded forward to the scheduled Stop time. For example, if the scheduled Stop time is 18:00 and Grace time is 10 minutes, it means that if the employee clocks out in the period from 17:50 to 18:00, then timecard will reflect a rounded start time of 18:00.
Round (forward to the scheduled start time)
Enter the time (in minutes) until which Clock out time should be rounded back to the scheduled Stop time. For example, if the scheduled Stop time is 18:00 and Round time is 20 minutes, it means that if the employee Clocks out in the period from 18:00 to 18:20, then the timecard will reflect a rounded start time of18:00.
Time
Enter any time as an example of scheduled Stop time to show Round, Grace and Dock times on the clocks.
|
- Click on the OK button.
 Note: Note: |
| Code and Name are unique and mandatory values. Before entering these values, make sure that there is no other rounding with the same Code or Name. |
To edit In/Out rounding:
- In the In/Out Rounding table select the Rounding you want to edit.
- Click on the Edit button. (A new page opens - Edit In/Out Rounding.)
- Edit the fields you want.
- Click on the OK button.
To delete In/Out rounding:
- In the In/Out Rounding table select the Rounding you want to delete.
- Click on the Delete button.
 Note: Note: |
| Roundings that are assigned to at least one employee, can't be deleted. |
To make an In/Out rounding active/inactive:
- In the In/Out Rounding table select the Rounding you want to make active/inactive.
- Click on the Edit button. (A new page opens - Edit In/Out Rounding.)
- Select Active check box to make the rounding active, or deselect to make inactive.
- Click on the OK button.
 Note: Note: |
- To also see inactive roundings in the In/Out Rounding set the Filter Conditions to Any.
- Rounding that are assigned to at least one employee, can't be set inactive.
|
Advanced In/Out Rounding
An Advance Roundings module is available that makes an advanced mode of In/Out, Lunch and Break rounding rules available. You may choose to use simple rounding rules (as described above) for some shift groups, and can choose advanced rounding rules for other shift groups. Please note that you can convert previously created simple rounding rules to the advanced mode, but you cannot convert advanced rules to simple ones.

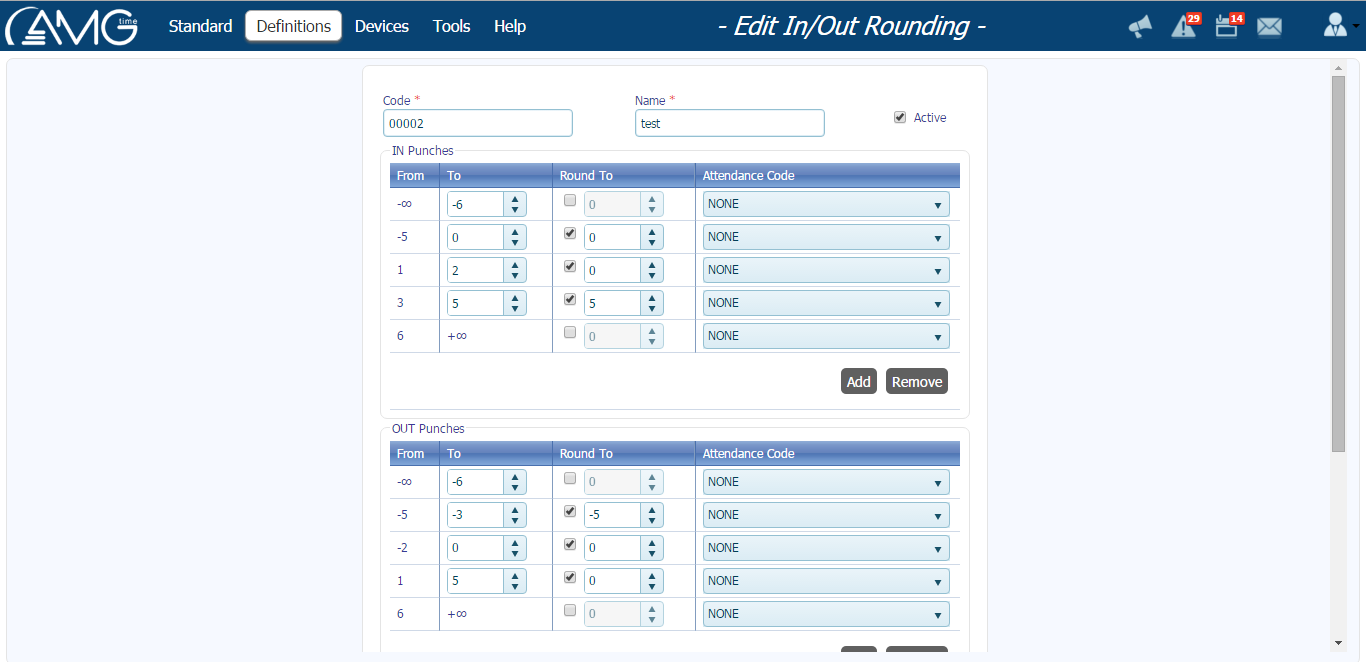
In the Advanced mode you can configure rounding both for START and STOP times of fixed shifts, and for the DURATION of Flex shifts. The configuration of rounding rules is based on time intervals defined in a number of minutes around the scheduled start time. Rounding rules for IN punches, OUT punches and the duration are configured in the Start (IN punches), Stop (OUT punches), and Duration (FLEX shifts) tables, respectively. The logic of configuring rounding is the same for the three cases. To configure the rounding rule:
- In the To field enter the end of the time interval (the start will be automatically defined in the From field according to the previous time interval). For defining a number of minutes before the scheduled start/stop or duration, use negative numbers, and for defining a number of minutes after the scheduled start/stop or duration, use positive numbers.
- If you want to apply rounding to the punches occurred in the given time interval, check the box in the Round to field and enter the rounding value in the text box next to it. For the scheduled start/stop time or duration use 0 value.
- Then in the Attendance Code field select the attendance code which should be applied to the punches occuring within the mentioned time interval. Clicking on the
 button will be open the page of Attendance Codes. (Click here to see the description of Attendance Codes.) button will be open the page of Attendance Codes. (Click here to see the description of Attendance Codes.)
- To add a new time interval, click on the Add button under the table.
- To delete a time interval, select the required record and click on the Delete button under the table.
To convert a simple rounding rule to the advanced one:
- Click on the corresponding Convert to Advanced link in the Convert column.
 Note: Note: |
| After converting a simple rounding rule to the advanced rounding modeyou cannot convert it back to the simple mode. |
Back to Shifts.
|


 Note:
Note: Adding New In/Out Rounding