AMG-100C Quick Guide
Navigation and Control
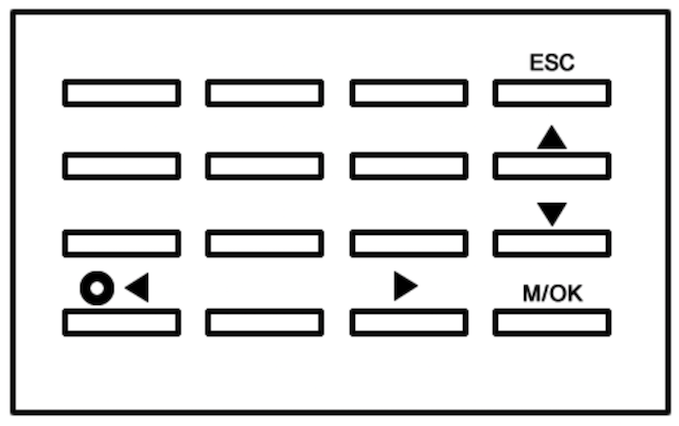
 : Enter or Menu button
![]() : Cancel or Back button
: Cancel or Back button
![]()
![]() : Navigate up and down
: Navigate up and down
![]()
![]() : Navigate left and right
: Navigate left and right
![]() : Power button (press and hold)
: Power button (press and hold)
The image above details the buttons of the AMG-100C. This guide will assist you with adding admins, employees, and newtork information into the device.
Enroll an Administrator
Enrolling an administrator means you enroll a user with full access to the terminal. Once a terminal administrator has been enrolled, the menu access will be restricted to only administrators.
Access Administrator Menu
1. Press and hold the M/Ok button for few seconds, then the menu will be open. Note: If the device shows a lock screen then someone has already been enrolled as an admin. A software admin is not the same as a device admin.
2. Select User Mng then press the M/Ok button. Then select New Users then press the M/Ok button.
3. Specify your desired Admin ID, for example '123 ' - this must be unique and not used by any other employees in the system.
You then have the option to enroll a fingerprint (or fingerprints) a password, and/or a card.
Enroll Admin's Fingerprint(s)
4. Select Enroll FP by pressing the down button then press the M/Ok button.
5. Place and remove your finger three times as prompted by time clock.
6. Once you see a green check, press the M/OK button if you want to enroll another fingerprint.
7. Press the ESC button one time when finished enrolling fingerprints to go back to the user screen.
Enroll Admin's PIN Code (optional)
7. Select Enroll PWD and press the M/OK button. Specify the password number twice then select Ok on the screen and press the M/Ok button on the device.
Enroll Admin's Proximity Card / FOB (Optional)
8. Select Enroll Card and press the M/Ok button then wave proximity card or FOB in front of the keypad.
Security level Assignment
9. Press the down arrow to select Purview, then use the right arrow button to change security level to Admin.
10. Select the Ok option on the screen, then press the M/Ok button to save your administrator enrollment.
You should see a message that says Changes Saved! Continue? when you have successfully added an admin. If you press M/OK you can enroll more employees or admins.
Enroll an Employee
The process for enrolling an employee is the same as enrolling administrator (as seen above), without changing the purview field. If there is an admin on the device, any employees will not have access to the device menu.
Access Administrator Menu
1. Press and hold the M/Ok button for few seconds, then the menu will be open. Note: If the device shows a lock screen then someone has already been enrolled as an admin. That admin must place their finger to access the menu. A software admin is not the same as a device admin.
2. Select User Mng then press the M/Ok button. Then select New Users then press the M/Ok button.
3. Specify your desired Admin ID, for example '123 ' - this must be unique and not used by any other employees in the system.
You then have the option to enroll a fingerprint (or fingerprints), a password, and/or a card.
Enroll Employee's Fingerprint(s)
4. Select Enroll FP by pressing the down button then press the M/Ok button.
5. Place and remove your finger three times as prompted by time clock.
6. Once you see a green check, press the M/OK button if you want to enroll another fingerprint.
7. Press the ESC button one time when finished enrolling fingerprints to go back to the user screen.
Enroll Employee's PIN Code (optional)
7. Select Enroll PWD and press the M/OK button. Specify the password number twice then select Ok on the screen and press the M/Ok button on the device.
Enroll Employee's Proximity Card / FOB (Optional)
8. Select Enroll Card and press the M/Ok button then wave proximity card or FOB in front of the keypad.
You should see a message that says Changes Saved! Continue? when you have successfully added an admin. If you press M/OK you can enroll more employees or admins.
Configure Ethernet Communication
Based on the type of software license for your subscription, please configure your time clock accordingly.
Note: If your software required installation and is opened by an icon on your PC desktop, then you have the Client/Server (Desktop). If you need to login to amgwebtime.com to access your system, then you have AMG Web.
AMG Client/Server (Desktop)
Follow this guide to enter in your network information into the device.
Then follow this guide to add your device to the software.
AMG Web
Follow this guide to enter in your network information into the device.
Then follow this guide to add your device to the software.